Table of Contents
3. How to use the Game Manager
This chapter will be about adding games, making playlist and adding media.
Start ‘PinUP Popper Config’ (windows Start Button > Pinup> PinUP Popper Config) if you haven’t already.
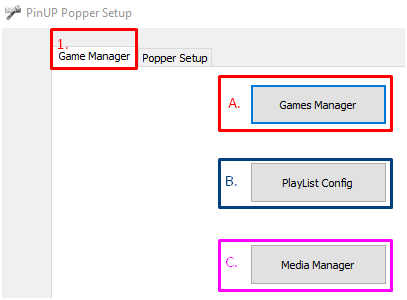
You’ll see a screen open, and you need to click on the ‘Game Manager’ tab ( <font inherit/inherit;;#e74c3c;;inherit>1</font> ) and you’ll see the following:
We’ll be going through steps A - C as seen in the image above.
A. Games Manager
The Games Manager is used to add, delete or edit your games.
1. In the ‘Game Manager’ menu, click on ‘Games Manager’.
There you will find 4 different tabs to choose from:
The ‘All Games’tab shows all the games you have in your database. Here you can also edit game information or add several other options.
<font inherit/inherit;;#e74c3c;;inherit>Note</font> ‘Keep Displays ON’ = You can enter what displays you want a game to use. 0 =Topper, 1 =DMD, 2 =BG (BackGlass), Leave Blank for default of EMU.
In the emulator setup if you have it set to have a screen always On, Then put NONE (Example: Using PuPPack)
You can update the selected table by either drag'n'dropping the new file onto the filename field, or by pressing the 'Update' button right next to the field. All relevant files (table backglass, pov, etc.) and media can be renamed in accordance with the new version on the ‘ImportData’ tab. (See more here)
In the ‘Lookups’ tab you set up and add additional game information (Game Types, Categories, Themes, Manufacturer) along with custom parameters used for scripts or launching games.
'Alternative Launcher.exe' allows you to use a different execultable to run your game than the system default one (such as another version of Visual Pinball). Once you fill in in the filename of that executable and make sure it exists in the same folder as the primary executable (usually VisualPinball for VPX), you can select it in the game entry on “All Games” under Alternate Launcher. Then every time that game is run it will use that executable,
The ‘ImportData’ tab is used for importing metadata for installed games (such as year, manufacturer etc.).
We’ll be focusing on the ‘Add New Games’.
2. Click on ‘Add New Games’ tab (
<font inherit/inherit;;#e74c3c;;inherit>1</font> ) and the following screen will appear: 
3. Select your desired emulator by clicking ‘Scan Filter Emulator’ (in this case Visual Pinball X) ( <font inherit/inherit;;#e74c3c;;inherit>2</font> ). Keeping it on ‘All Emus’ is also an option if you want to copy games from various systems. Just be sure to have everything set up properly like mentioned in: Chapter 2B. Emulators.
4. Click on ‘Include Sub-Folders’ ( <font inherit/inherit;;#e74c3c;;inherit>3</font> ) and You should only select “include sub-folders” if you have tables/games setup inside sub-folders of your table root folder. (the standard method is to have all tables in root, so normally you won’t need this checked.).
5. Click on ‘Scan For New Games’ ( <font inherit/inherit;;#e74c3c;;inherit>4</font> ).
Now you should be presented with a list of games (or tables in this case).
6. Now you can either ‘Remove them from list’, ‘Select All’ of them and ‘Add the Games to the System’. <font inherit/inherit;;#e74c3c;;inherit>Note</font> An added game will be highlighted in <font inherit/inherit;;#16a085;;inherit>green</font> . <font inherit/inherit;;#e74c3c;;inherit>Note</font> You can double check if your folders are all correct by checking either ‘Open Game Folder’, ‘Open Rom Folder’ and ‘Open PuP-Pack Folder’.
B. PlayList Config
Here you create playlists for use with PinUP Popper.
1. In the ‘Game Manager’ tab click on ‘Playlist Config’.
2. Select (or create) a playlist on the left.
3.Click on the games on the right side of the screen and click ‘<– Add Game(s)’to add them.
4. You can remove games from a playlist by selecting that playlist and then clicking on 'Remove Games –>‘.
By right Clicking on a playlist will bring up the option to: -Add \\Playlist -Remove \Playlist -Rename Playlist
Right clicking on a game in a playlist gives you the option to add it as a favourite (it will also highlight in <font inherit/inherit;;#27ae60;;inherit>green</font> ) or remove it as a favourite.
C. Media Manager
Here you can set up and manage all your media for your games.
In the ‘Game Manager’ tab click on ‘Media Manager’ and you will be presented with the following screen:
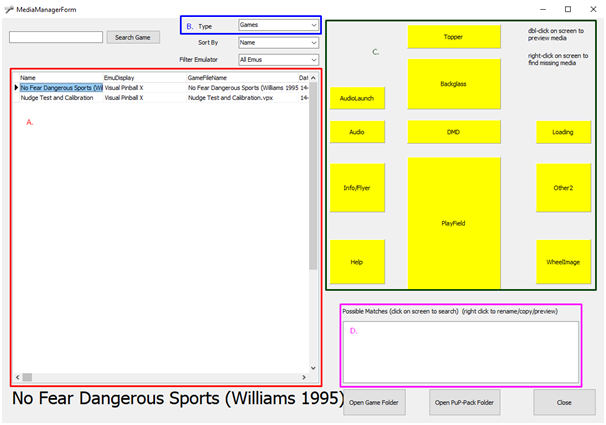
We’ll be going through the different parts of the Media Manager (A - D) as seen in the image above.
Basics <font inherit/inherit;;#e74c3c;;inherit>A. Shows the Games including the Emulator, GameFileName and the added Date.</font> <font inherit/inherit;;#2980b9;;inherit>B. Type is important if you want to change between Games and Playlists.</font> <font inherit/inherit;;#27ae60;;inherit>C. The ‘Boxes’ (don’t know how else to call them), which represent the different media.</font> <font inherit/inherit;;#8e44ad;;inherit>D. If you have more than 1 media file for each box, it will be shown here. The next page will show several things in more detail.</font>
A. Games List
Screen you use to select your game (or playlist). When you select a game, the boxes on the right (C) will show what media is (or is not) available.
B. Type: Changing Media for Games or a Playlist
You have the option to add (or change) media for either games or for a specific playlist item, that you’ve created in Chapter 3B. You can change this by clicking on either ‘Games’ or ‘Playlist’ under ‘Type’:
C. Boxes
When clicking on a game name ( <font inherit/inherit;;#e74c3c;;inherit>A</font> ) notice the boxes on the right side of the screen (C). Each represents the specific media that is or is not available for a table.
**IF a box is yellow ** | \\ **IF a box is green ** | |  | **{{:a5f4171c39d4e63f9a9a5ba221995282.png}}** |
|
As seen on the image in the previous page, there are boxes available for: Topper, AudioLaunch, Backglass, Audio, DMD, Loading, Info/Flyer, PlayField, Help, WheelImage, Other2.
<font inherit/inherit;;#c0392b;;inherit>Note</font> Since
<font inherit/inherit;;#c0392b;;inherit>V1.3.2</font> there is also a box for Wheelbar. This is only viewable when you go to ‘PlayLists’ first.

Box Options
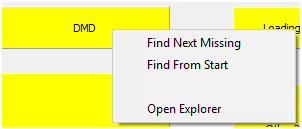
Right click on a box gives the following options:

Find Next Missing: Goes through your game list and shows the game of which the media is missing.
Find From Start: Similar to find next but will start the search not from the current game you have selected, but will start from the beginning of game list.
Open Explorer: Go the specific Box location on your hard drive. Handy feature for when you want to copy files.
<font inherit/inherit;;#8e44ad;;inherit>D. Matching more than 1 media files</font>
By clicking a box there’s a chance you find several possible media files.
In the window mentioned below you can choose which one to use:
Rename File: The file will be renamed to match the game name.
Make Copy: Will keep original file and rename/copy file into proper location.
Preview File: Shows an example of that selected media file.
Adding media
1. Open your Windows Explorer and go to where you keep your Media files.
2. You can either:
A. Drag and drop the media to the specific box you selected (C) and it will automatically be renamed to match the game name.
Or
B. you can copy the media straight to the specific location on your hard drive using Microsoft Explorer.
<font inherit/inherit;;#c0392b;;inherit>Note</font> Your Main Media folder can be found at: Your Hard drive:\PinUPSystem\POPMedia\
You can also select a box, right click and use the Box Options mentioned here to open Explorer and go to the correct folder and copy to there.
Creating MediaPacks
When you Right Click on game, you will get the option to Create a MediaPack containing all the media you have available of that specific table:
 <font inherit/inherit;;#c0392b;;inherit>Note</font> Your created MediaPacks can be found at:
Your Hard drive:\PinUPSystem\Mediapacks\
Using an existing MediaPack
To use a MediaPack on a game do the following:
1. Select a game.
2. Drag and Drop the Media Pack file on the Playfield box.
3. Confirm by clicking ‘Yes’.
It will basically extract the mediapack, take all the media and rename them so they match your game.
Adding Media for custom Themes:
If you want to have your own “Popper” default videos and wheel images, then you need to copy the new media to your “PoPMedia \ Default \ System” folder.
If you want to have your own “Emulator” default videos, then you need to copy the new videos to your “PoPMedia \ Emulator \ System” folder.
Playlist media only plays when the Playlist is“highlighted”. This includes media for sub-playlists. The only exception are wheelbars. When you go into a playlist, it will use that Playlist's wheelbar. There are no Loading videos for a Playlist.
Each and every Table however can have their own media for everything.
Don't forget that HOME LIST can also have its own default media.
If you are using multiple wheelbars for example…don't forget to add a wheelbar to the HOME LIST, or the last wheelbar image used within a Playlist will still be active when going back to the HOME LIST.


