Table of Contents
2 Getting Started (Popper setup)
First, you need to make sure pinupmenu.exe is set be Run as Administrator! This allows Popper to do things like close out other programs when exiting a table, or stopping a recording of media.
NO other files in PinupSystem folder can be set to Run as Administrator!
**UPDATE**
There should be no need to run any Pinball Related Software As Administrator (Admin)
Please see Common Issues (FAQ) on the Left
Before running any games, you MUST do a first initial setup.
Start ‘PinUP Popper Config’ (windows Start Button > Pinup> PinUP Popper Config).
You’ll see a screen open, and you need to click on the ‘Popper Setup’ tab (1) and you’ll see the following:
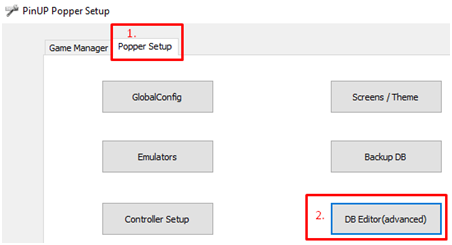
We’ll be going through steps A - F as seen in the image above.
A. GlobalConfig
1. Check (or change) the Default Media Directory:
Go here by clicking ‘GlobalConfig’
In the screen that opens, go to the ‘Main’ tab and make sure that you set the ‘Default Media Directory’to same location you entered when installing PinUP Popper!

By default the Default Media Directory it’s on C:. Be sure to adjust this correctly.
2. Optional settings you might want to change (depending on your setup), while still in GlobalConfig:
Joystick Driver (found under the ‘Game/Wheel Toolbar’ tab):
Select one of 3 options:
-XInput JoyDriver (Newer controllers like Xbox 360, Xbox 0ne)
-DirectX JoyDriver (Pinscape, older controllers)
-No \Joystick
Dof with Popper (found under the ‘Script’ tab):
Click on ‘Open Script File’.
Scroll to / DOF CONFIG and then
Change var useDOF = false to true
NoteIf nothing happens try to open the ‘pupmenuscript.pup’ file in Windows Explorer and set ‘Always use’ to ‘notepad.exe’.
B. Emulators
1. In the ‘Popper Setup’ tab click on ‘Emulators’.
Here you can edit or add new emulators for use with PinUP Popper:

The most important thing here is to make sure that all folders are properly set, along with the proper game file extension, otherwise it won’t work.
‘Keep Display Open’: What display(s) can the emulator use.
0=Topper, 1=DMD, 2=BG (Backglass), Leave Blank for default of EMU.
Keep Display Open: Normally, when you launch an emulator all Displays will hide, you can tell Popper to Keep Display Open to continue playing media while in emulator. Example to keep a topper screen/video playing while in a game that doesn’t support toppers.
Also be sure that the emulator(s) you want to use are ‘Active’ by ticking the box in the upper right that says ‘Emulator Active in System’
2. Use the buttons on the bottom to scroll through the different emulators:
3. One you’re done, click ‘Close’ to go back to the main screen.
C. Controller Setup
See this wiki page:
D. Screen / Theme
1. In the ‘Popper Setup’tab click on ‘Screen / Theme’
2. Disable here what screens you don’t have (or need) by going to the screens and setting this up for the Topper, DMD, Backglass, etc.
Note that these settings only apply for Popper Menu, not the tables you launch through the menu. These settings can be used to override 'default' settings made in PinUp Player display setup. Default values should work fine for most setups as long as Player display configuration is made correctly.
Show = Player window will be opened if configured in Player display setup. Does not force the player in front of other windows and wont show the player at all if set not to show Player display setup.
Force Pop/On/Back = Player window will be forced to show even if not configured in Player display setup.

3. Afterwards save by clicking on ‘Save PuP-Pack’.
E. Backup DB
It’s important to backup your Database frequently. Do this by doing the following:
1. In the ‘Popper Setup’ tab click on ‘Backup DB’.
A window will pop up:

2. Click on ‘Yes’to confirm.
Note Your created DB Backups can be found at: Your Hard drive:\PinUPSystem\\PUPBackup\ .
After you do a backup you can rename that file anything you want as a reference
F. Using Backup DB
In order to use a backup file Rename it the same as the one that's in the pinup system Folder and them move into the pinup system folder
G. DB Editor (advanced)
Advanced SQL database editing. Examples may follow in the future.
  \
 1. In the ‘**Popper Setup**’ tab click on ‘**DB Editor (advanced)**’.
You use this screen to edit the database using SQL codes.
Here you can also import a ‘puplook.csv’ database file by clicking the ‘Import Lookup’ button. For more information see Chapter 4.
H. Updating Game Manually In Pinup Popper
After you put the game in the tables folder
Go into game manager on the left click the game
Then at the top click on Import Data
Then click Rename Current Game Manual Entry