Table of Contents
How to import metadata for your games
There are two ways to import game metadata (year, manufacturer etc.). You can use 'Web lookup' to fetch the information directly from the internet, or alternatively export a puplookup.csv file to use directly;
How to import and use a puplookup.csv file
The ‘puplookup.csv’ is a DataBase (DB), which is filled with data, that you normally would have to type in yourself in the fields of the ‘All Games’section of the Game Manager.
Data like for example: TableName, Manufacturer, Release Year, Game Type, etc.
This DataBase file will help you automatically fill in the fields by just doing some simple mouse clicks (or typing in a few keywords).
https://virtualpinballspreadsheet.github.io/export
export from above website (select popper format) and take the downloaded file and place into your local PINUPSYSTEM folder. NOTE: filename must be named EXACTLY puplookup.csv
Popper Config will use the file directly to import the meta data. It doesn't support a global(all tables) import as names and filename formats are not a standard in the vpin community. So importing meta data needs to be done on a individual table/game basis.
Before we start with the instructions, there’s one thing you need to do before hand:
A. Backing up your (current) DB
1. Start 'PinUP Popper Config'.
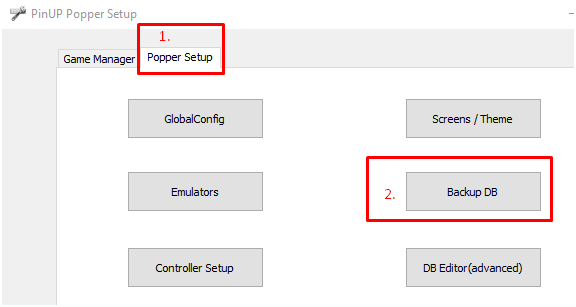
2. Go to the 'Popper Setup' tab (
1 ).
3. Click on the 'Backup DB' button (
2 ).
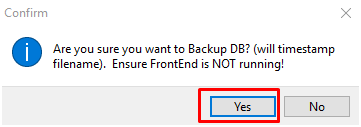
4. Confirm with ‘Yes’ in the Popup Window that opens:
5. Now Close Pinup Popper Config by clicking ‘Exit Setup’.
Using the Import function
TIP: double clicking on a game in Games Manager will take you to the import tab automatically
A. Click on the 'Game Manager' tab ( 1 ).
B. Click on the 'Games Manager' button ( 2 ) and you'll go to the 'All Games' screen, which should have all your games in it.
Note I’ll use an example for the next few steps, but you can try it on any game you want. Do take into account that whether a game and data is available depends on which ‘puplookup.csv’ you have downloaded. Some don’t have all games or data fields included.
Example: Editing ‘The Addams Family (Bally 1992).vpx’ using ‘import’.
Take a second to watch the picture.
The steps in the next page will make more sense after that.
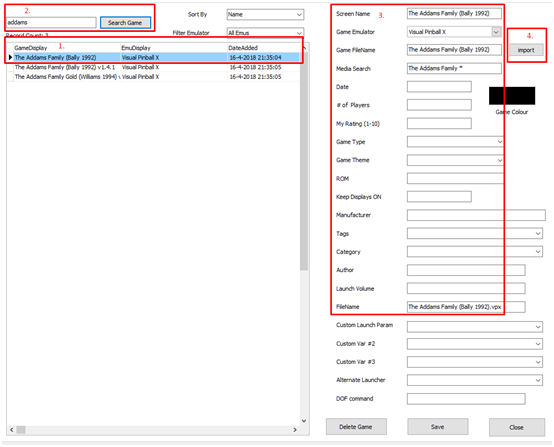
C.In you Gamelist (
1 ) select the game that you want edit or use the import function on.
Note You can use the ‘Search Game’ ( 2 ) function to find a game in your game list quickly before doing step C.
Also Notice how the most of the fields on the right ( 3 ) aren’t filled in yet.
D. After selecting a game, click either the 'import' button ( 4 ) or double click the GameDisplay game. The following screen will now open:
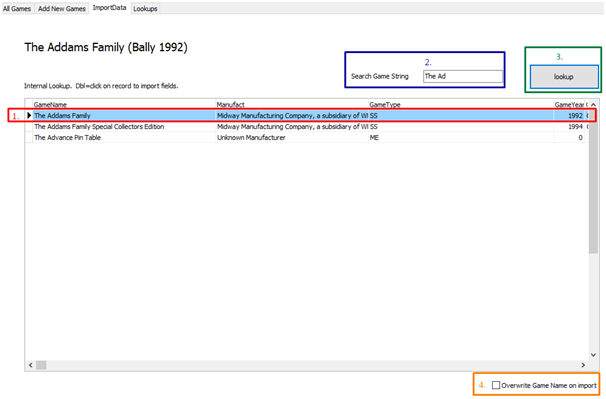
In most cases the table should already be shown in the list ( 1 ). If this correct you can double click it and you will go back to ‘All Games’ screen.
Note If your game is not shown in the list or the list is empty, you can try typing in (parts) of the Game Name in the ‘Search Game String’ ( 2 ) and click on the ‘lookup’ ( 3 ) or ‘Web lookup’ button, depending on wether you want to fetch data locally or from the Internet, to show the results.
Notice there’s an ‘Overwrite Game Name on import ‘ option ( 4 ). Enabling this will change the Game Name on the 'All Games' screen to the name that’s shown here on the 'ImportData' screen. If you want the name to stay the same, for instance if you have set the names to your liking, even if you update files and/or metadata you should leave this unchecked.
Either double click the result you want to import, or click the 'Import Fields' button bottom right.
Note: The 'Rename Current Game to PrOPPER Format' and 'Rename Current Game Manual Entry' can be used to rename the table and all associated backglass, media, POV files etc with one handy action, see more here:
https://www.youtube.com/watch?v=AoVkUBsUT-Q
F. Now you're back in the 'All Games' window. Notice that several fields ( 1 ) on the right have been populated with data.
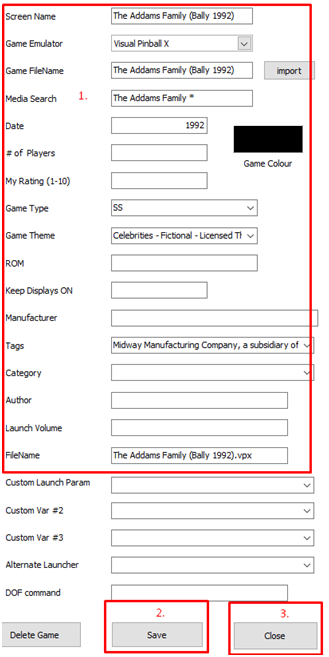
G. Remember to always click the 'Save' button (
2 ) before exiting or else all the data fields will remain empty next time you go here.
H. When you’re done editing your games using import, click the ‘Close’ button (
3 ).

